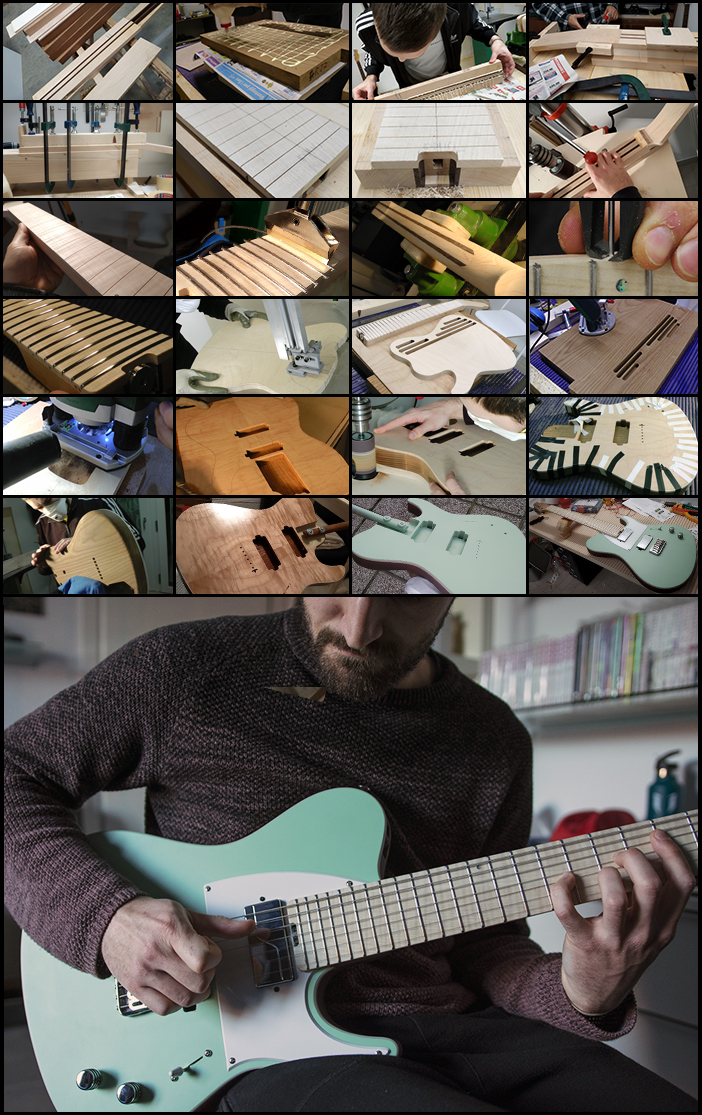
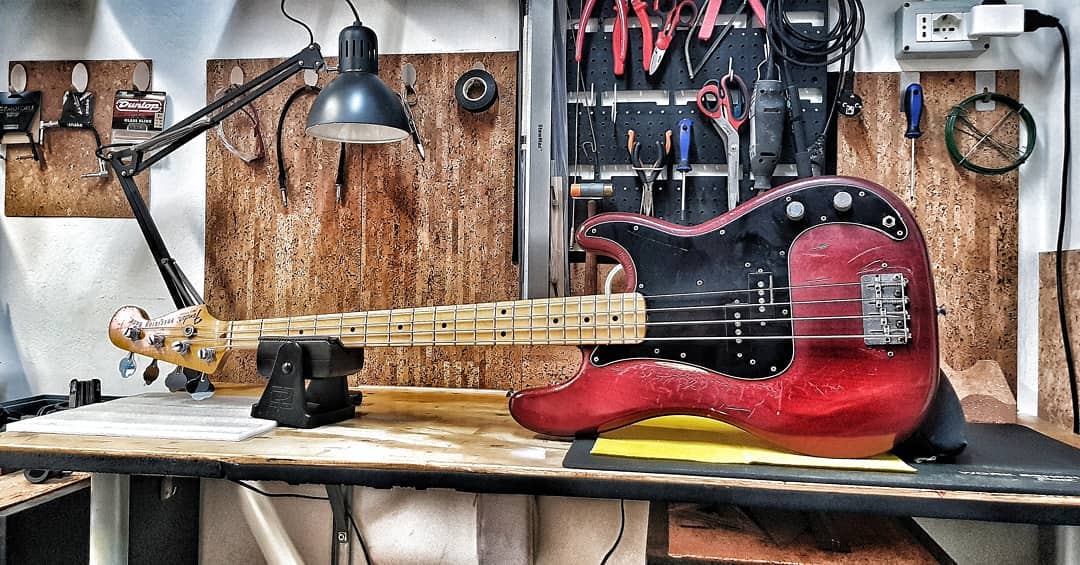
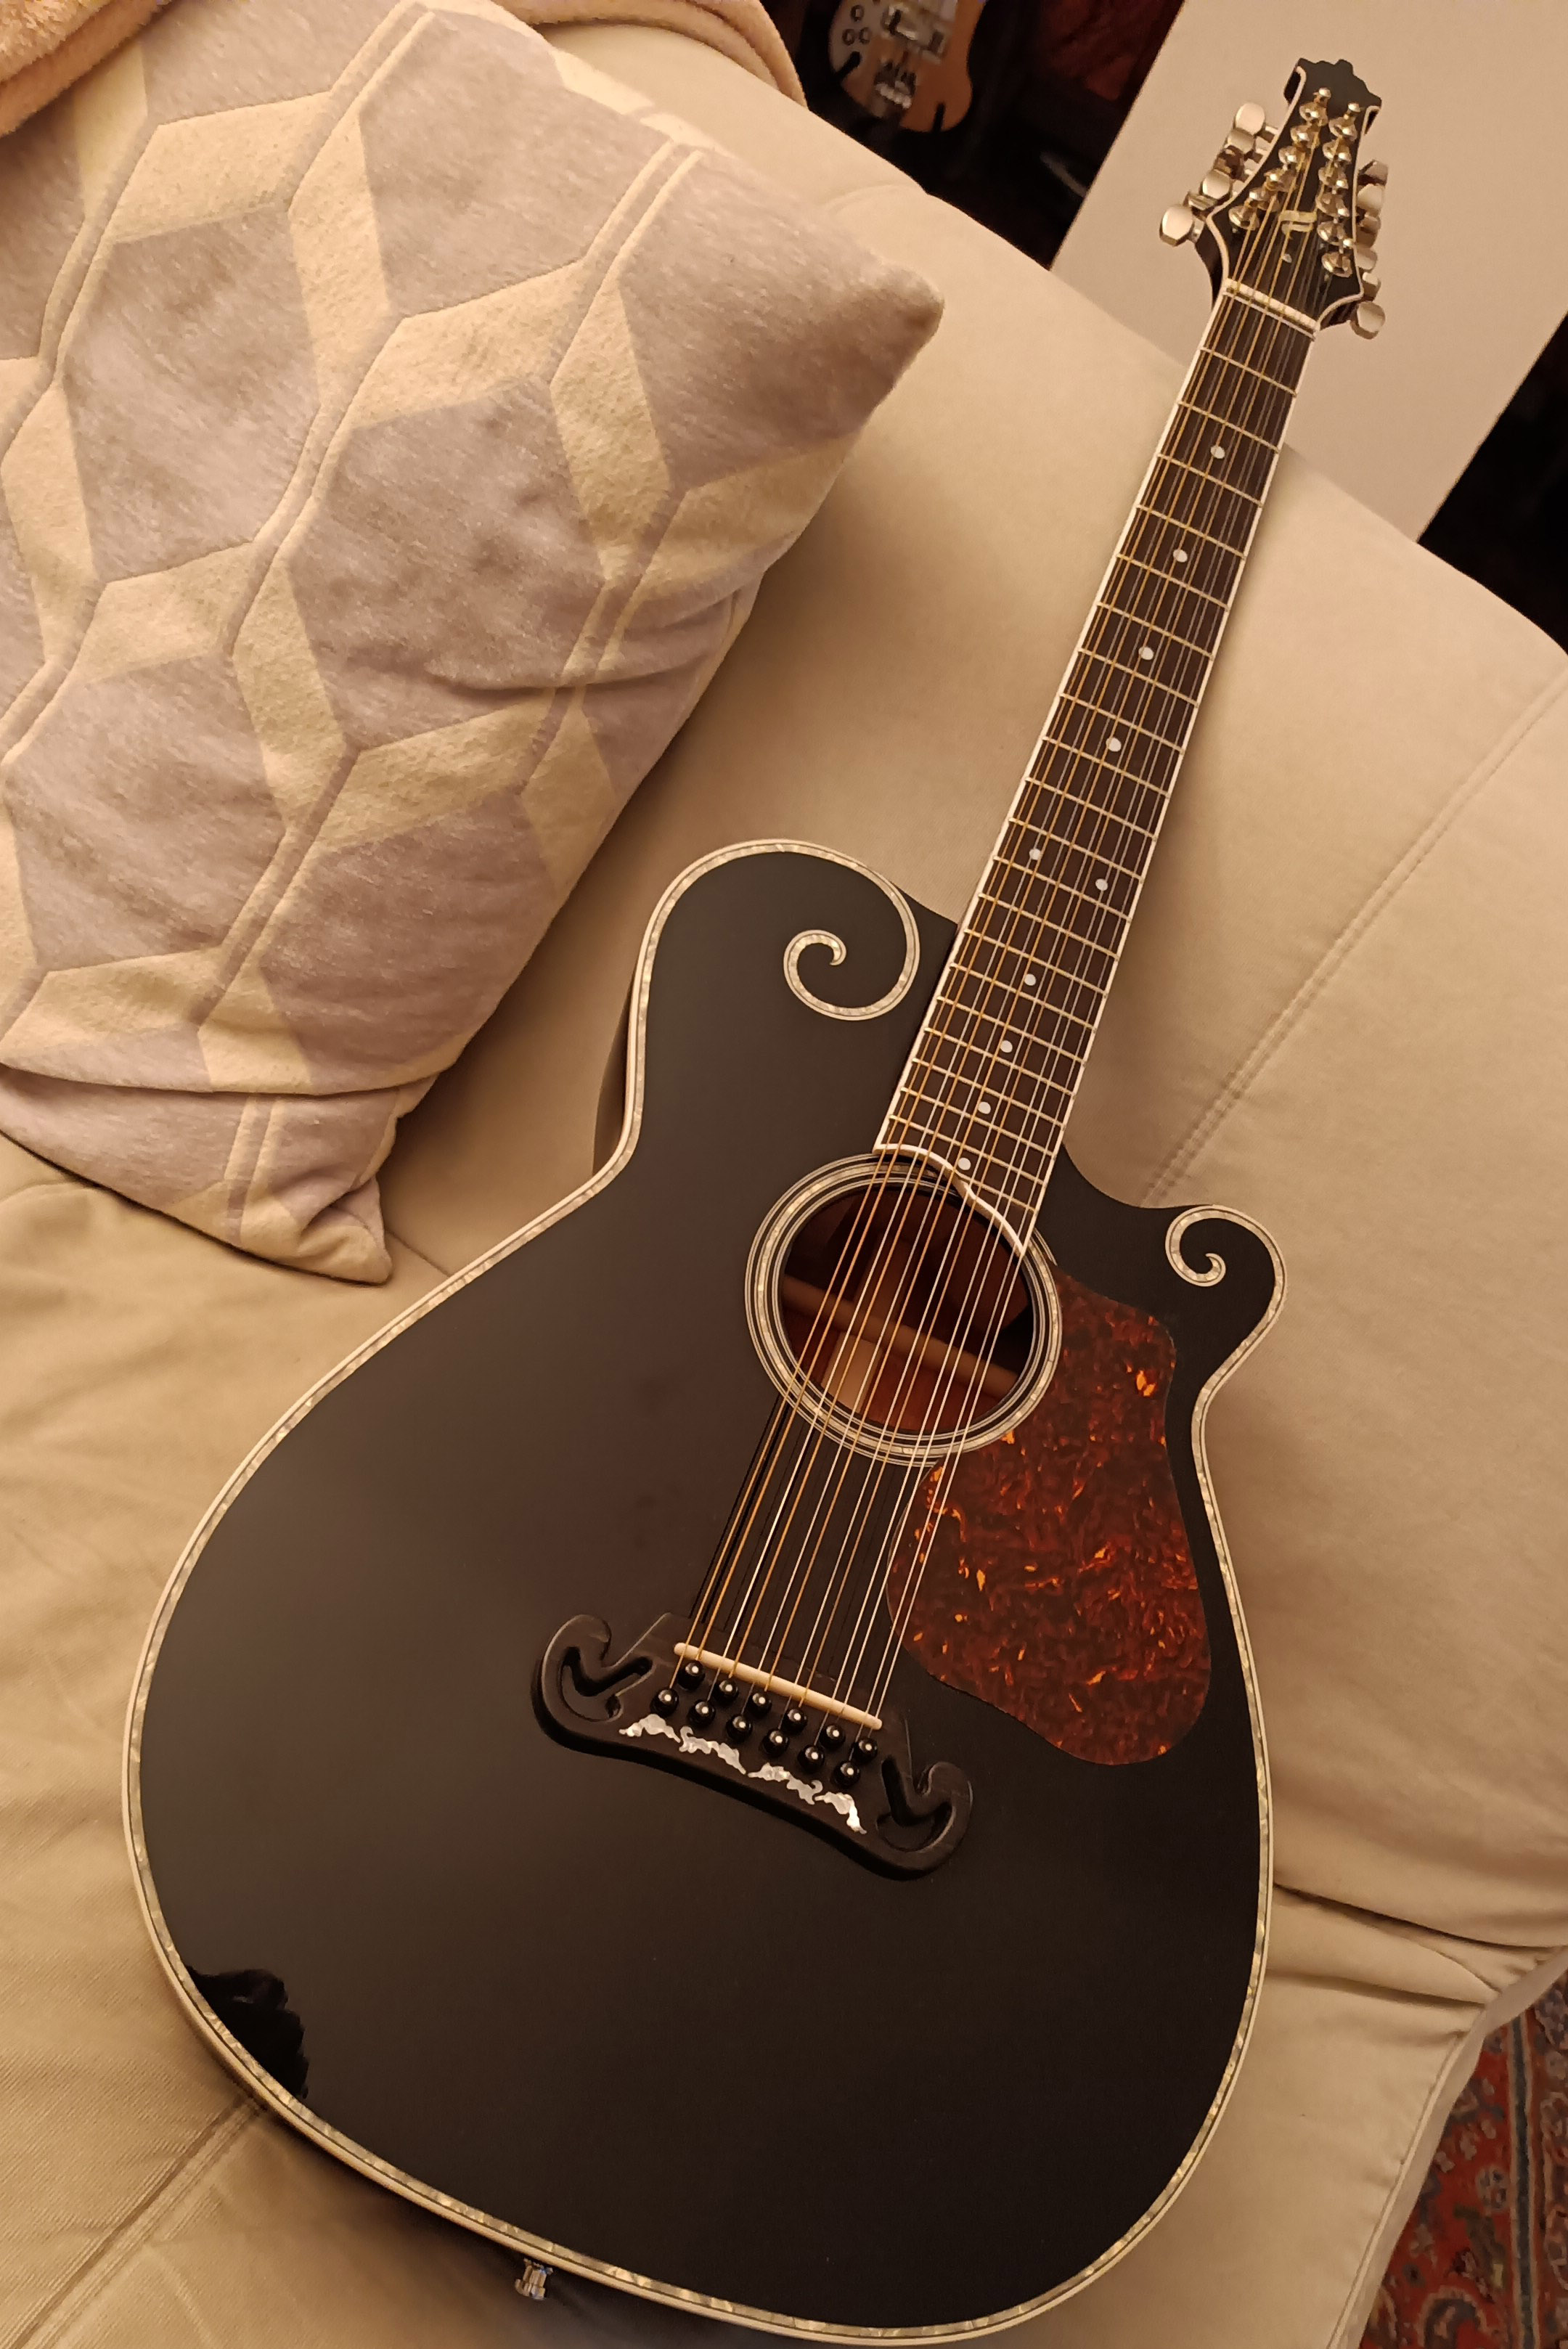
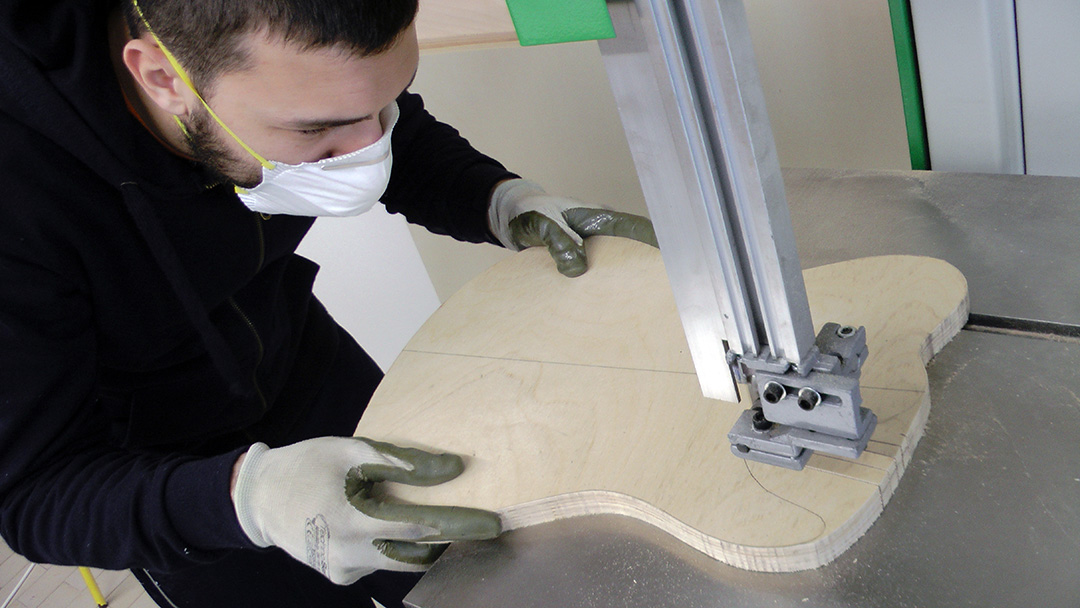
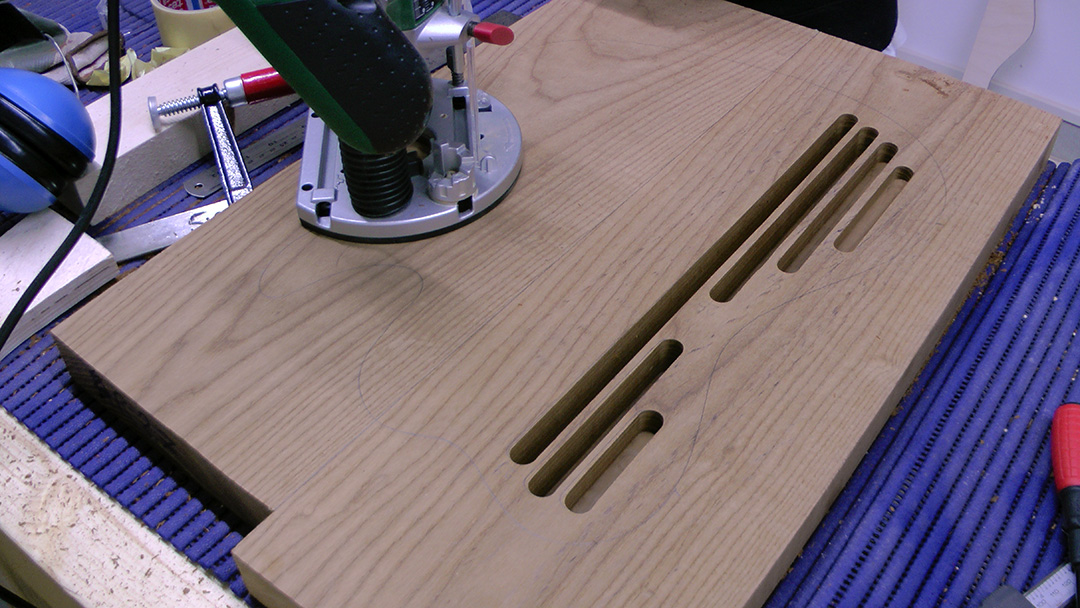
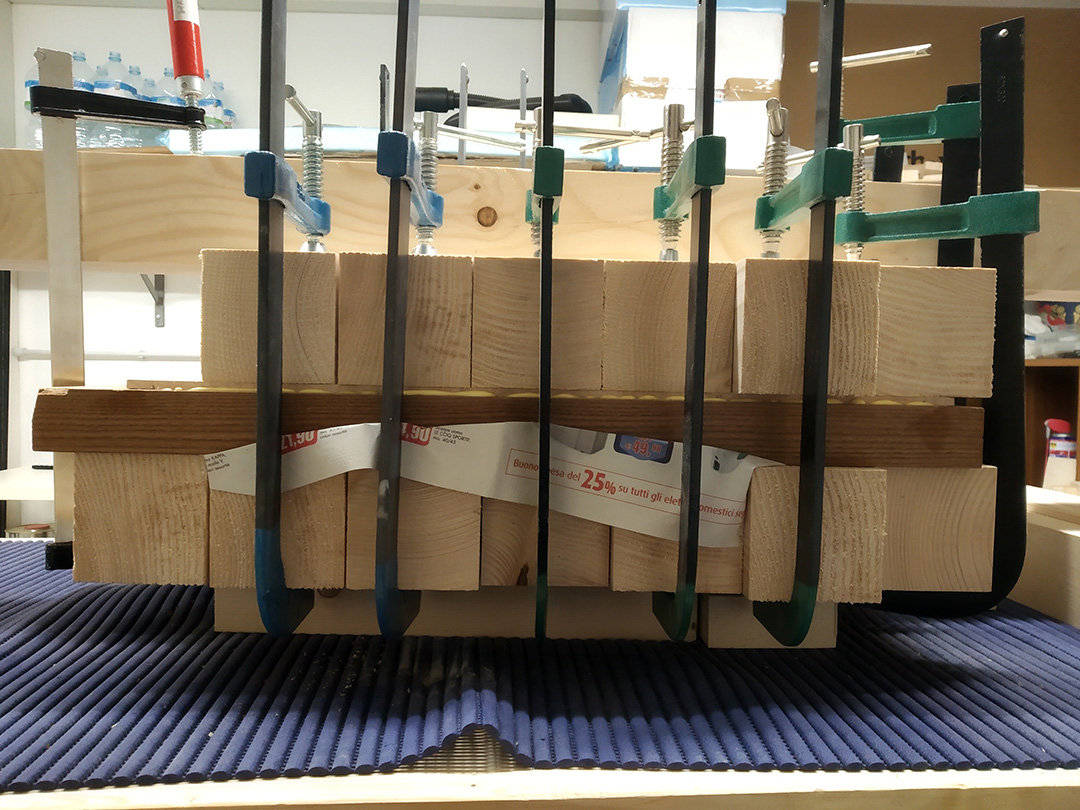
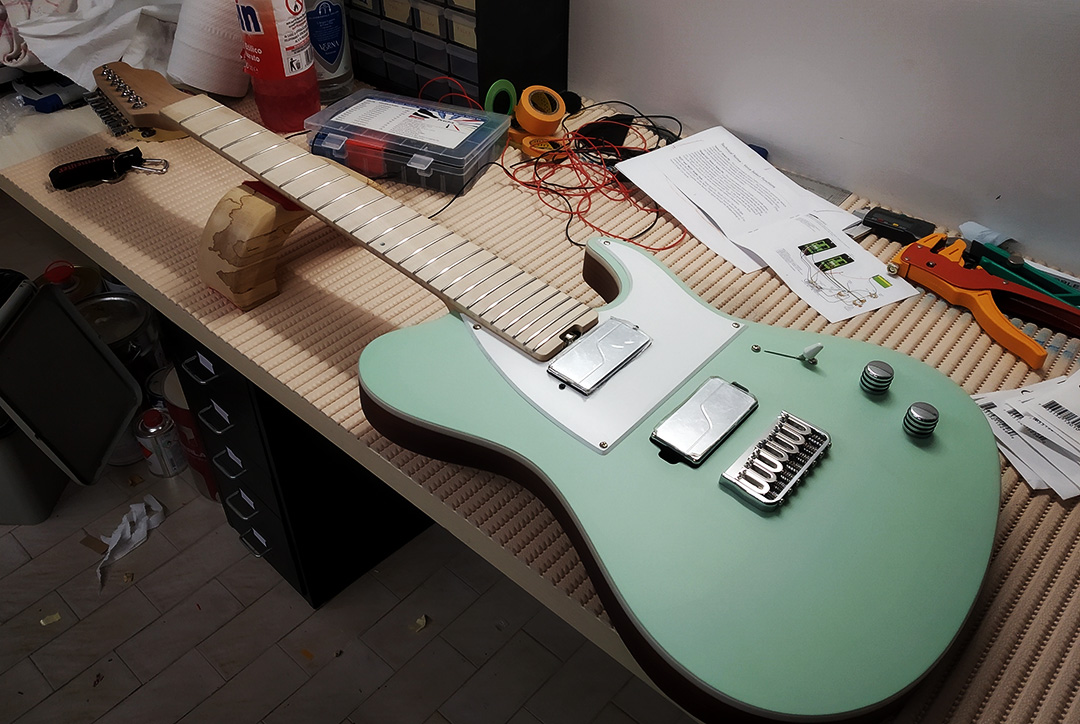
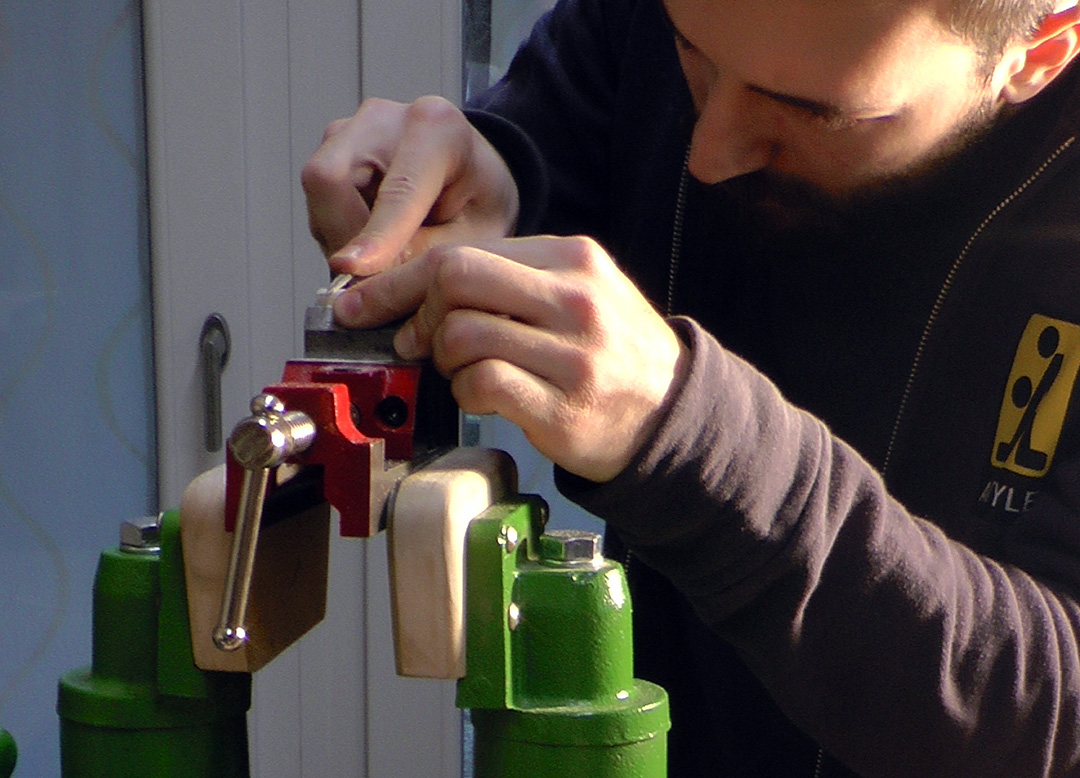
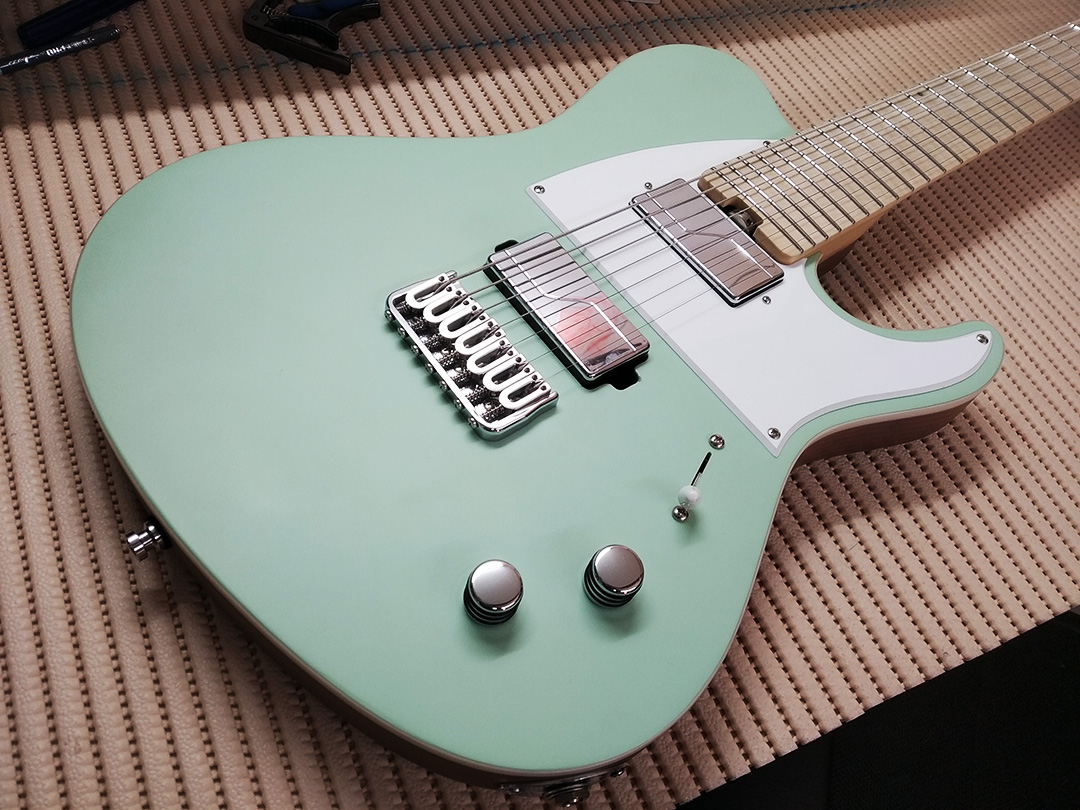
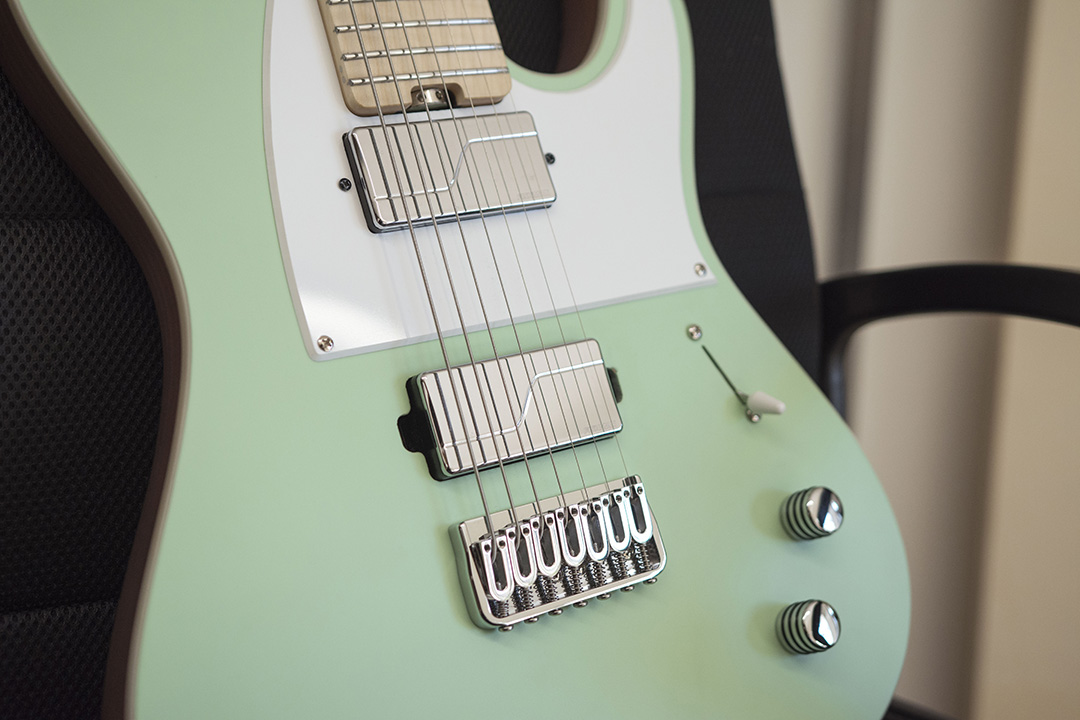
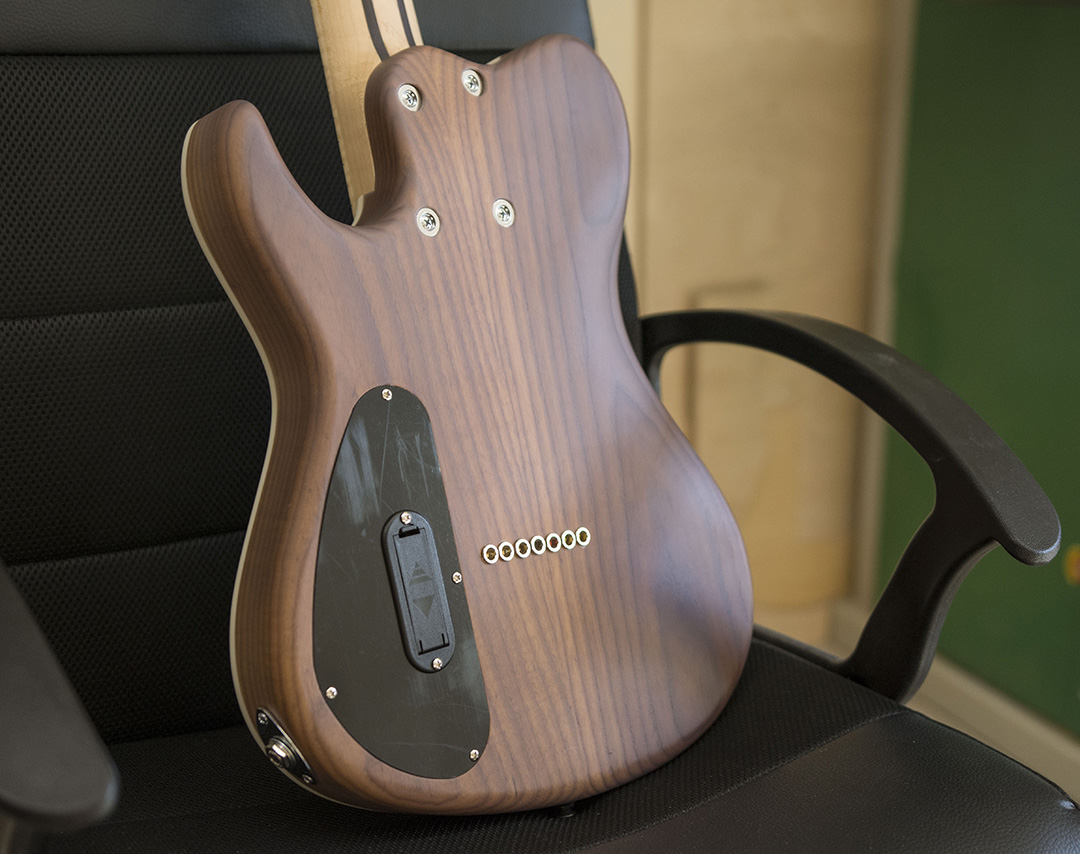
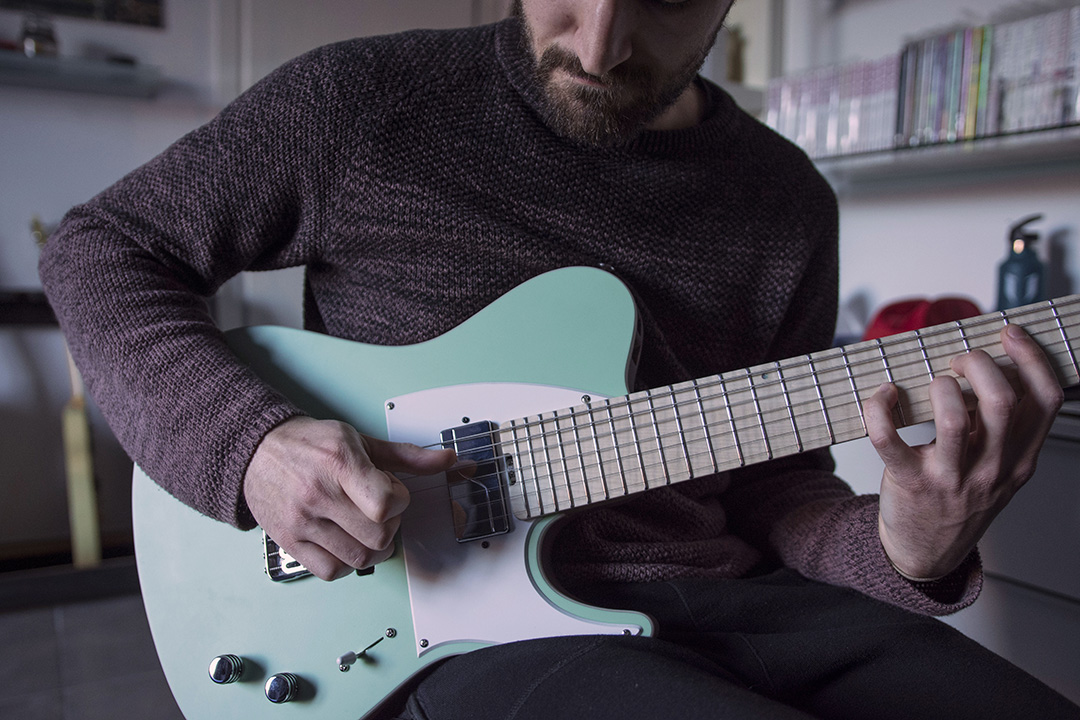
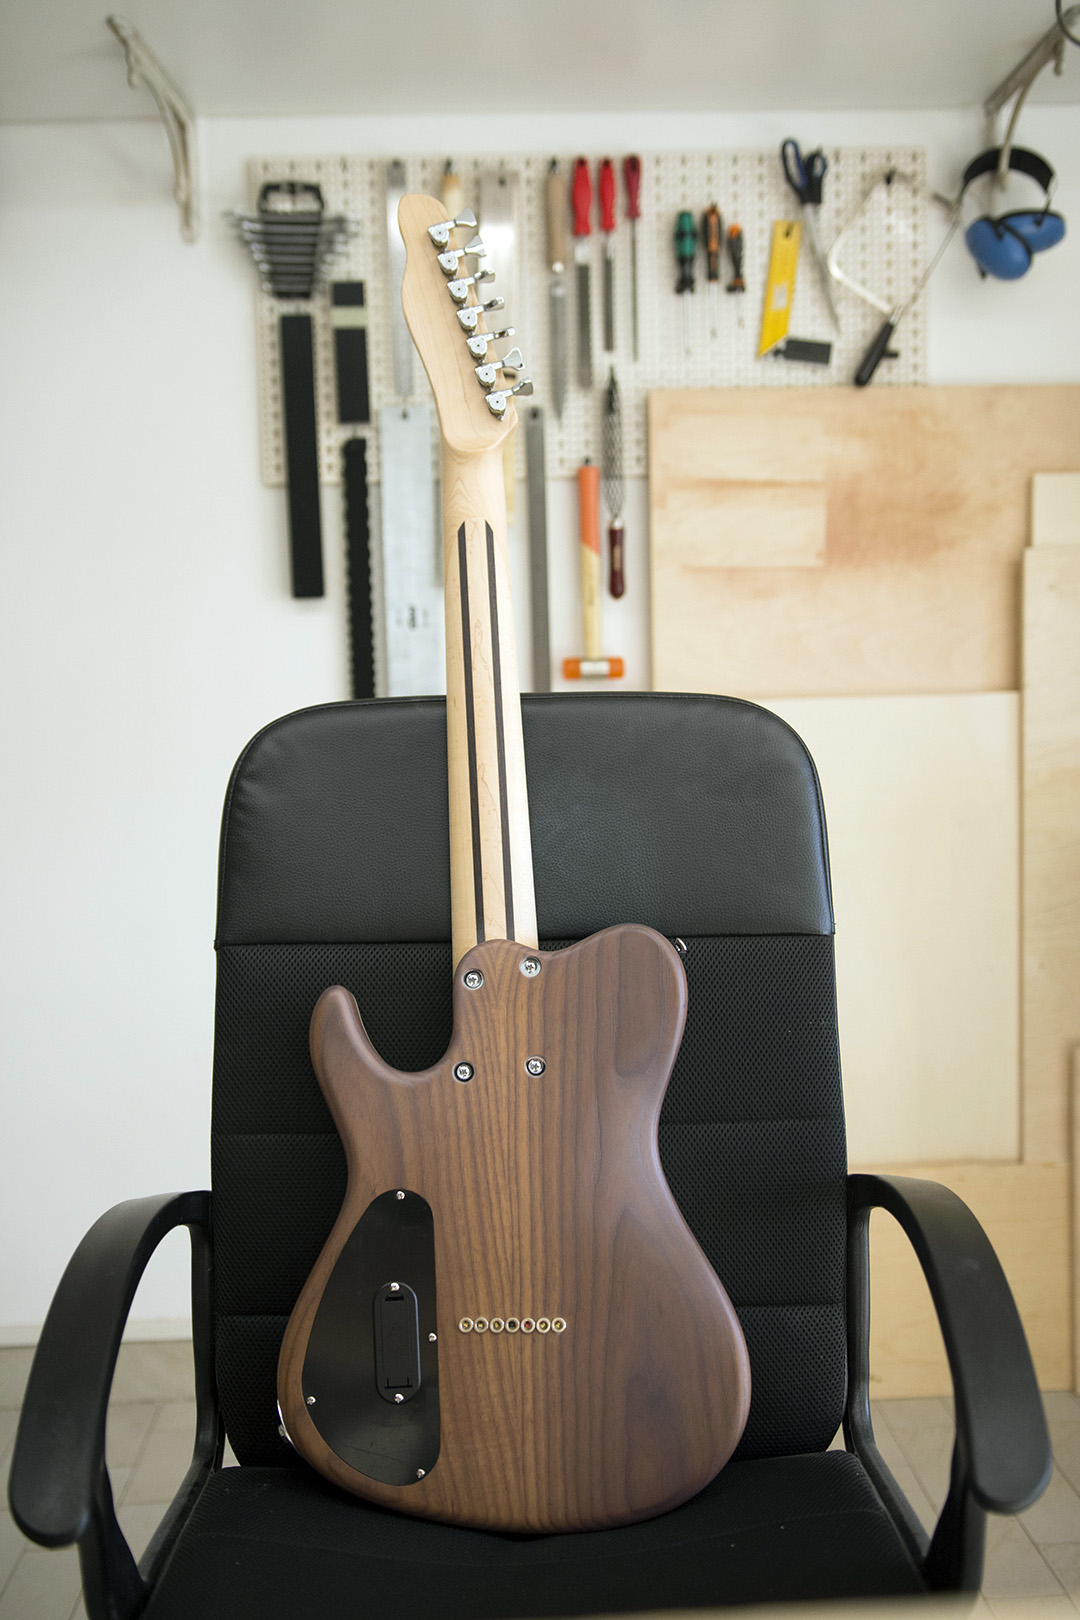
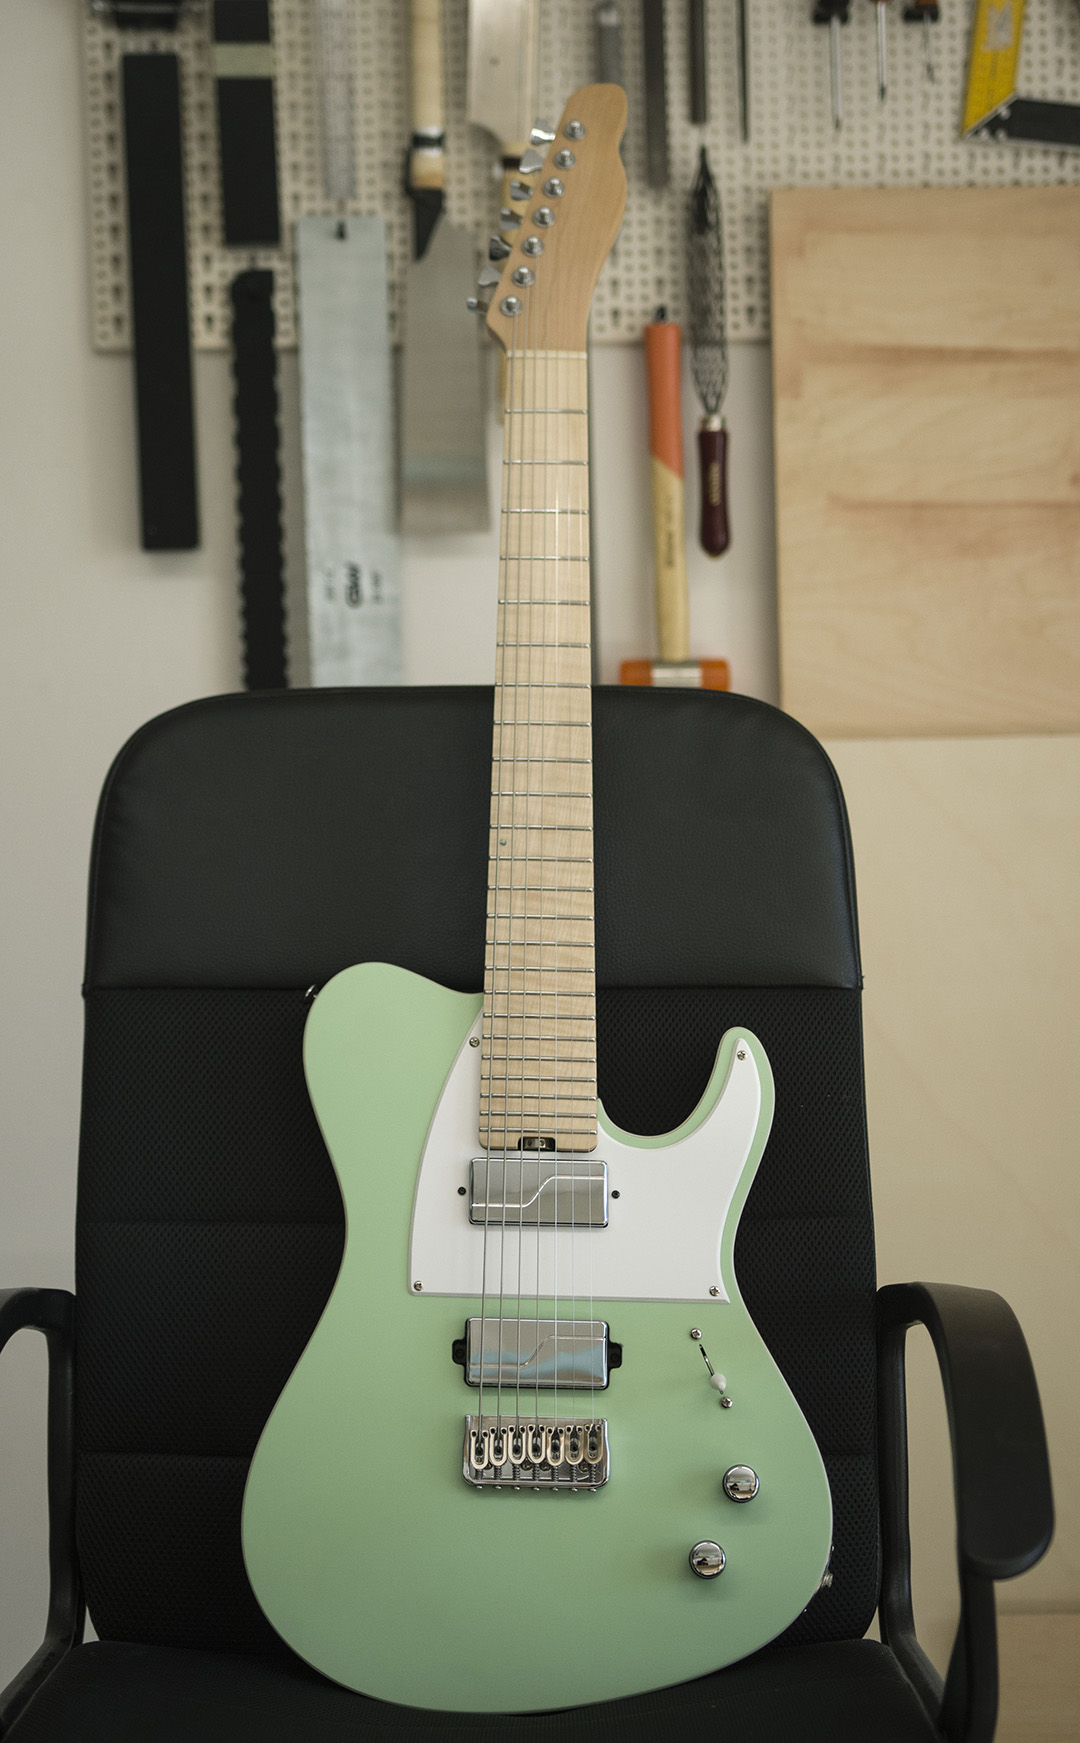
With Galeazzo Frudua assistance, the student has established their own workshop where he can now build their own line of BOUTIQUE guitars and basses from "A" to "Z" and work as a FRUDUA certified luthier.
He chose every detail of the instrument he wanted to build, from wood selection to scarf neck construction, tone chambers, hardware, pickup, controls, and finishing.
This page, rich in descriptions, photos, and comments, walks you through every step of building your own boutique guitar (even ONLINE if you prefer) to the level of quality found in the best handcrafted guitars on the web.
Join the FRUDUA guitar-making class and build your own electric guitar from scratch. Contact me here for your custom guitar making program. Learn to build guitars professionally! NOW ALSO ONLINE!
You will be able to set-up your own workshop in about a month with Galeazzo Frudua assistance.
Get everything you need to build and repair guitars and electric basses in a 4m x 4m room like a garage or basement.
Attend Galeazzo Frudua course either in-person or online.Galeazzo Frudua will provide instructions on how to perform the lessons via webcam.
Are you unsure about the effectiveness of the online course? Take a look at the below fully inlaid acoustic 12-string guitar built by Stefano Occhioni of Loro Piceno during Galeazzo Frudua online course, which showcases its potential.
This is a crucial part of the course as it gives you a deep knowledge and the confidence to move forward with building your own guitar in every single step of the construction phase.
With this knowledge, you'll be confident that you know exactly what you're doing and the outcome you want.
After the theoretical lesson, you'll continue with the drawing phase where you'll learn to reproduce in real size and measures the original sketch you had in mind.
This is where you'll learn how to turn your envisioned instrument and whatever shape you have in mind, into reality.
We typically start with a sketch created by the student. The goal is to turn it into a functional and ergonomic instrument, similar to the example of the bass.
Throughout the course,Galeazzo Frudua will show you how to bring the design to life and walk you through each step of creating a working musical instrument.
The next step in the process of building your own guitar is to select the woods and determine the number of pieces the body will consist of.
To build their own guitar, the student chose a single piece of roasted swamp ash for the body, and a 6mm maple cap for the top.
The ash adds depth and warmth to the tone. The maple top cap will add some mids, attack and presence.
The fretboard and neck will both be made of maple, which will provide a defined high end and stability. In addition, the student chose craft the neck out of a sandwich of Wenge and Canadian maple. This is a very stiff solution that will improve sustain and give the low B string a "piano-like" tone.
The use of two different woods for the neck in building your own guitar, enhances the tone by combining the resonance peaks of both woods, leading to increased articulation, sustain, and stability.
During the next step, the body and neck blanks, as well as the fretboard, are prepared to the desired thickness and the top is planed for gluing.
The lesson covers the explanation of the function and application of all the required woodworking tools, and provides a comprehensive, step-by-step guide so that even if the student is not allowd to use the machinery itself, they can still provide precise instructions to the woodworker.
Carpenters often inadvertently harm valuable wood because of their lack of knowledge about the specific tolerances needed by luthiers.
The scarf joint is a technique used in guitar construction to join the headstock to the neck of the guitar.
This technique, which is taken from classical guitar building, involves splitting the neck blank into two pieces and then repositioning one of them, which will form the headstock, at a slight angle before gluing the two parts back together again.
This method strengthens the connection between the headstock and neck, reducing the possibility of breakage in case the guitar is subjected to impact or dropped.
Furthermore, building your own guitar with a scarf joint, tightens the connection between the neck and headstock, helping to eliminate dead spots on the fretboard, where notes may sound unclear or lack fullness.
This, in turn, improves the overall sustain of the guitar, meaning the length of time that notes can be held and heard after they are played.
By utilizing a scarf joint instead of a traditional straight joint, the amount of wood required in the construction of guitars is reduced.
This has a direct impact on the environment as it means fewer trees need to be cut down to produce the same number of guitars.
Furthermore, the more efficient design of the scarf joint results in less waste during the production process, which helps to minimize the environmental impact to build your own guitar (even in an online course).
By reducing waste, guitar makers can operate more sustainably and ensure that their operations have a smaller carbon footprint.
This is particularly important in today's world, where protecting the environment and reducing the impact of human activities on the planet is a key concern.
Next, we route the truss rod cavity on the neck blank. The student selected a low-profile, double-action truss rod that allows for adjustments of the neck's up-bow and back-bow, regardless of string tension.
The truss rod slot is made with a Bosch routing machine and a specific bit that perfectly matches the size of the truss rod for a precise fit.
Unlike single-action truss rods, the double-expanding design simplifies the routing process.
To build their own guitar during the online or in person Frudua guitar making course, the student learns an advanced technique for cutting fret slots on a guitar.
This technique involves cutting the frets so that they follow the radius of the fretboard, rather than cutting straight slots.
A first cut is made using a Meter Box, which serves as a guide. The guide slot is then deepened to the proper depth to match the radius of the fretboard and fit the tang of the fret with a few cents of millimeters of accuracy.
Cutting fret slots with precision is an important aspect of crafting a guitar.
When the fret slots match the radius of the fretboard and fit the tang of the fret precisely they help eliminate any empty space under the frets, which can have a negative impact on the sound of the instrument.
Too much empty space underneath the frets can lead to a weakened and unstable neck, resulting in dead notes, reduced sustain, and decreased volume.
On the other hand, preserving the wood by eliminating empty space enhances the volume and tone of each note, making the instrument sound better overall.
The fretboard is glued to the neck using Titebond aliphatic resin after the fret slots are cut.
During the FRUDUA Build Your Own guitar guitar making course (available also ONLINE), you are taught that the grain direction of the fretboard should be considered when gluing it to the neck blank.
This technique helps to predict which direction the neck will bow, regardless of the truss rod's action.
Additionally, the truss rod should have its own tension within the neck for optimal sustain and to prevent dead notes.
After the fretboard is glued, and the next step involves carving a small routing for easy truss rod adjustment without having to loosen the strings.
The truss rod should always be adjusted with the strings under tension to achieve a "up-bow" in the fretboard that aligns with the elliptical vibration of the strings, resulting in low action and no buzzing.
This translates in a step-by-step guide for building your own guitar which allows the student to revisit the information and follow the same steps in the future when they want to make another guitar.
The log serves as a reference for the student to use as they gain more experience and knowledge in guitar making.
The following step involves sculpting the neck and fretboard.
The student, who has already created a template, uses self-adhesive paper to place it under the neck as a guide for the Robosander.
The student will use two different grits of sandpaper to sand down the neck and headstock together, resulting in a smooth wood surface.
In guitar making, having consistent neck profiles and measurements is important for providing every player with the same comfortable playing experience.
Two tools can be used for shaping the neck: a router bench and a Robosander.
Regardless of which tool is used, the crucial aspect is to ensure that the neck profile and measurements are exactly the same for each guitar.
About halfway through the process of radiusing the fretboard we will insert the single dot that the student has chosen to install and then continue with the radiusing up to grit 320.
The dot is inserted in a seat that has been created with a dedicated drill. This is a maple fretboard so the work must be extremely precise as there is no room for filling dents or burrs as you could easily do with darker woods like rosewood or ebony.
The next step in to build your own guitar implies installing the frets. For this task we will use a dedicated press called "Fret Arbor Press".
The size and material of the frets are chosen based on the player's desired feel on the fretboard and their resistance to wear and tear.
This consideration is important as it affects the playability and durability of the instrument.
A player's preference for a certain feel on the fretboard can vary, and fret material must also be strong enough to withstand repeated use.
The fret size and material selection is therefore a crucial step of the "Building your own guitar online Frudua course.
The frets are pre-shaped before being inserted and are treated in a special way to ensure they remain firm in place.
Alifatic resin will be used to glue the frets, and once the glue has dried for 12 hours, we can move on to the second stage of the fretting process, which is beveling the frets and fretboard edges.
After learning how to create the neck template, the student is taught to design the body template. This template acts as the master, ensuring consistent quality for every instrument produced in this guitar line.
The template is made of a special marine plywood that is extremely stress resistant. The student transfers their original drawing to the birch plywood blank and begins cutting and contouring the template with the a band saw .
Following the completion of the saw cut, the student shapes the template with files and sandpaper.
The creation of tone chambers or cavities in the body is a crucial step in the guitar building process which is accomplished using a Bosch router machine.
The tonal chamber slots have a specific design, including shape, depth, and placement, that follows specific acoustic tuning rules.
This process is similar to the tuning of high-end loudspeakers and is crucial for achieving the desired sound quality and tone from the instrument.
The inclusion of a tonal chamber in the instrument has a direct impact on its sound quality, as it amplifies the character and tonality of the wood used in the instrument.
This process is similar to the tuning of high-end speakers and is essential for bringing out the natural nuances and qualities of the wood, providing a more rich and dynamic sound that can enhance the overall musical experience.
Thus, the tonal chamber plays a critical role in the overall sound and performance of the instrument.
The roasted swamp ash core is glued to the maple top, which adds attack and brilliance to the overall sound of the instrument.
The combination of these two woods produces a very balanced sound, which, when combined with the maple neck and fretboard, gives the instrument a full-bodied and present sound appropriate for the genre the student has in mind for this guitar.
While the glue sets and dries, which will take about 12 hours, we begin beveling the frets and fretboard, a critical operation for a comfortable and fast feel on the fretboard.
This is just one of the details that you learn only during the Frudua "building your own guitar online" course that sets Galeazzo Frudua students' instruments apart from other luthiers' instruments in that they are immediately appreciated by professionals.
After 12 hours, the glue is cured, and the guitar making course moves on to routing the pickups and circuitry cavities.
For the routing of the pickups, a H/H pair of active Fishman Fluence pickups, the guitar manufacturing course included the fabrication of a unique template that is not available on the market.
With a constant abundance of 1.5 mm, the template cutout's outline shape precisely matches the pickup's shape.
The volume and tone controls are combined with a 5-position 5 way switch included with the pickups, which returns a series of coil combinations.
This image shows the body after the routing of the pickups and neck cavity have been completed. The neck will fit into the neck body cavity with tenth of a millimetre precision.
In order to better support the routing machine and enable us to operate in a safer and more stable manner during the luthiery course, it is essential to route the body before it has been shaped.
To accommodate this, the portion of the fretboard that extends beyond the last fret on the neck has been lengthened by a few mm.
During the "Build Your Own Electric Guitar" course, Galeazzo Frudua share with the student the advanced bandsaw cutting techniques that he learned attending the world-renowned Antonio Stradivari School in Cremona, prior to cutting the body template.
These techniques allow you to shape even intricate shapes with great accuracy, cutting within a fraction of a guide mark.
This way, you can significantly reduce the time it takes to machine all the parts of the instrument if you're using the Robosander.
The result is a high level of precision in shaping the body of the instrument, contributing to the overall quality of the finished product. If you're using a bench router you will not need to pre-cut the body to prevent the router drill to damage the final shape.
The next step in building your own guitar implies shaping the body with the bench router or with the Robosander in this case.
The carefully made hand-template is placed under the body and serves as the master for all similar shapes in the student's series.
The template is positioned with care to align with the centerline. With the Robosander, 80 and and 150-grit sanding sleeves, the body outline is shaped, ready for final sanding.
It's time to route the back of the instrument's contour body.
To do this, we use discarded pieces from the previous cutting phase of the body as supports for the routing machine.
This contour body has a 12.7 mm radius that determines the placement of the rear circuit cutout and to some extent, the controls.
Before assembly, the pickups undergo a pre-fitting process to verify that everything is on track.
The aesthetic appearance is just as important as the functionality.
A perfectly fitting pickup in the cut not only provides a more seamless and visually pleasing look, but it also adds to the perceived value of the instrument.
The presence of front-mounted pickups on guitars highlights the significance of being meticulous in the creation process to produce a unique and precious instrument.
Have you ever encountered instances where pickups are mounted directly to the wood, but housed within a routing that was originally meant for a mounting ring?
This is what you will learn during the Frudua guitar making course: the numerous details that contribute to creating a distinctive instrument, both in appearance and tone, enabling you to sell it at any price point.
In the process of building your own instrument, making sure the neck fits snugly into the cut-out on the body is crucial for sound transmission.
The neck/body joint plays an important role in transmitting sound from the nut where the strings begin to vibrate to the bridge saddles where they reach the diapason.
To ensure a tight neck fit, you learn to create templates that guarantee all sides of the neck are perfectly aligned with the body, preventing, for instance, your high E strings from being too close to the fretboard edge.
Rather than opting for a "natural binding" on the top, the student chose a white plastic binding.
The plastic binding not only offers protection but also enhances the appearance with its chromatic contrast against the dark brown of the roasted ash body.
A special cutter bit is employed to produce a precise slot along the entire outline of the top for the purpose of accommodating the binding.
The binding is then fixed with care to the guitar body with a specific glue and tape. This technique is widely used in the creation of top-quality stringed instruments, which are typically hollow-body.
Learning this skill will be useful for the student when they will start building Archtop guitars in the future.
The guitar-making process of building your own guitar continues with shaping the neck contour while the glue on the body sets.
Each player has a neck that feels more comfortable and allows them to play faster, typically found on their most frequently played instrument.
The back of the neck will be consequently made according to a shape preferred by the student, which he will copy from one of their own 7-string guitars.
The student learns how to precisely design whatever neck profile they wish while taking the FRUDUA guitar making course. This requires learning skills like utilizing rasps, files, and sandpaper and is done entirely by hand.
This hand-crafted approach is important for creating customized necks shapes for professional musicians, and is a valuable skill for the student to have.
In order to consistently generate the same neck contour form on their line of instruments, the student also learns how to build their own neck contour jig.
This is what the neck looks like after the contour is shaped.
You can clearly see what the neck back contour and the scarf neck looks like, where the maple/wenge and the headstock portions converge.
During the process to build your own guitar, you will also understand the importance of the volute for the instrument's sustain.
A guitar volute is a decorative and functional feature found on some guitar neck joints. It appears as a small bulge located near the heel of the neck where the neck meets the headstock.
The volute provides additional strength to the neck joint providing sustain.
It is often seen on classical guitars and some other styles of acoustic guitars.
Next, we move on to drilling holes for the tuners, which is a crucial step that requires high precision skills.
The holes must be aligned accurately with each other and positioned correctly in relation to the string trapezoid so that they come out of the nut and reach the side of the tuning machine post while maintaining a straight line.
This will be important to ensure tuning stability if we ever want to make a tremolo version of the instrument.
It is important to note that the placement and accuracy of the neck screws can greatly affect the overall setup and performance of the instrument.
Poorly drilled screws can lead to issues such as strings overflowing from the fretboard, making the instrument difficult or even impossible to play.
This is a common problem and highlights the significance of correctly drilling the neck screws.
The proper drilling of the screws on the neck is also crucial to the overall set-up and alignment of the strings on the neck and in the fret beveling.
Incorrectly drilled screws can negatively impact the sound quality and sustain of the instrument.
During Galeazzo Frudua build your own guitar online course you learn that the neck joint plays a key role in transmitting string vibration from the neck to the body and from the nut to the bridge.
The student has decided to incorporate a touch of edginess by including aluminum side dots.
Aluminum side dots are becoming increasingly popular in guitar building, as they offer a contemporary and distinctive flair to the traditional design of guitars, providing a unique and modern look, with an aggressive appearance which helps differentiating the instrument from others.
This trend is appealing to musicians and instrument builders alike.
The student's choice to include aluminum side dots in their build demonstrates their creative vision and willingness to experiment with new design elements, is something Galeazzo Frudua encourages all time.
The dots are made from a 2.5mm diameter aluminum rod, and fitted in a precisely sized hole drilled in the side of the neck.
Each hole must be perfectly aligned with the others to ensure a seamless and cohesive appearance.
The rod is then inserted and secured with a cyanoacrylate glue, cut to size, and sanded to be level with the fretboard.
The final sanding phase of building the guitar online or in person is crucial and is focused more on the eye than on dexterity.
During this phase, the student learns to identify and correct any bumps, dips, and visible signs of previous work on the instrument.
The finish will emphasize any flaws that have not been removed, revealing any lack of experience in the building your own guitar process.
In big guitar making companies this phase is typically carried out by different individuals with specific roles, but in this case, the student will take on the task solo.
This is why it is vital to pay close attention to any detail.
Breaks in the action during the build a guitar process are used for the student to learn how to "spray the finish."
The painting phase is considered the most challenging part of the entire building process.
It requires a high level of concentration and skill, as well as knowledge of various factors that can affect the outcome.
That's why the Frudua Build your own guitar program includes a unique program that helps the student learn the basics of finishing very fast.
It is time to learn the art of achieving a mirror-like shine on the finish of a musical instrument. This is a crucial and sensitive step in obtaining a professional outcome.
By mastering the art of water sanding, you will be able to achieve a finish that rivals that of top-tier boutique instruments. Additionally, by learning to use the buffer, you will be able to create an amazing, mirror-like finish like the one you see in this photo.
Different abrasives are used to provide various levels of polishing grit.
Upon completion of the process, your instrument will display a reflection with a shine that rivals even the most high-end boutique instruments from top brands.
The body and neck are shown below, unpainted.
They have undergone a gradual sanding process using progressively finer sandpaper, starting from a coarse grit and ending with 320 grit.
It is essential that this process takes place immediately prior to the instrument being moved into the paint booth for finishing.
The student has chosen a satin finish for the whole instrument, body and neck and a green satin finish on the top.
During the finishing procedure, a grain filler is first applied to the ash back of the body to fill in the pores and grain patterns, creating a smooth and uniform surface. Then a sealer is sprayed on both the maple top and ash back of the instrument.
This acts as a base and aids in getting the surfaces ready for the application of finish later on
The sealer protects the wood and ensures that the finishing adheres properly to the surface.
Whlie the paint cures, the student attends the Advanced Guitar Setup course and Electronics Course to prepare for a career as a luthier, builder, and repairer, and will be ready to start working once the course is completed.
As the finishing process continues, the base coat is applied to the neck and fingerboard made from European flamed maple.
Care must be taken when applying the base coat to the fretboard to prevent excessive buildup on the frets.
During the fret dressing process, the paint will automatically removed itself from the frets, and the student will then polish the frets to a mirror finish for a smoother feel under their fingers on the guitar they have built on their own.
The following image shows the body after the sealer has been applied.
The student chose a closed pore finish with a satin surface.
Before applying the sealer, a grain filler was put to the ash portion of the body to speed up the filling process.
Later on a special satin finish will be applied for an amazingly smooth natural look.The body's ash wood can also be finished by leaving the pores open for a more natural look.
The instrument's top has already been painted green, and the binding is protected by masking tape that will be removed shortly.
The spray-gun in this photo contains the satin finish that will be sprayed on the entire instrument: body and neck.
Galeazzo Frudua will show you the correct type and brand of paint to use for each step of the process during the build your own bass or guitar online course.
It's typical for luthiers to spray the instrument vertically, but many finishing tend to leak, therefore extra consideration must be given when choosing the right catalyst for the purpose.
A catalyst is a substance that speeds up a chemical reaction.
The paint used in the course is formulated with a special catalyst, which helps to reduce the amount of dripping that occurs when the paint is applied vertically.
The satin finish applied to the instrument is designed to provide a delicate balance of sound, protection and appearance.
Bad sprayed finish can dampen the tone of the guitar you built on your own.
Consequently the student learn to spray it to a specific thickness that has been calculated to give the instrument a natural wood look while serving as a barrier to prevent impurities from penetrating and damaging the wood.
This thickness is also crucial for the tone, for maintaining the longevity of the instrument, as it helps to prevent wear and tear, as well as ensuring that the finish remains looking good for years to come.
The final result of the satin finish application can be observed in the pictures above (top) below (rear).
The expertly-applied satin finish gives the instrument a stunning, natural, enhancing its original wood look and provides excellent protection for the wood, safeguarding it against elements that could potentially alter its sound or cause it to deteriorate over time.
The photograph below showcases the neck of the guitar, with its European flamed maple fingerboard that has finished curing before undergoing fret dressing and polishing.
Some of the finishing may have accumulated on the frets during the finishing process, but this can be quickly remedied through sanding to provide a sleek surface.
The frets will then be dressed, crowned and polished for a smooth and finished look and feel under the player fingertips.
One of the most crucial steps in building your own guitar, is to ensure that the frets are precisely dressed to the highest level of accuracy, down to the hundredth of a millimeter, to guarantee a flawless and seamless playing experience.
During the Frudua guitar making course, Galeazzo Frudua will teach you a one-of-a-kind and proprietary fret dressing procedure that is only taught to his students.
This procedure is intended to give Galeazzo Frudua students the tools and knowledge they need to achieve frets that are leveled and accurate to one hundredth of a millimeter.
While maintaining the same level of accuracy, this system is significantly more efficient and cost-effective than the commonly used PLEK system.
Galeazzo Frudua aim to equip his students with the skills and knowledge they need to produce results that meet the highest expectations of even the most demanding professionals.
Students will be able to achieve the results they desire with confidence and peace of mind, knowing that the final product will be of the highest quality, thanks to Galeazzo Frudua exclusive fret dressing system.
It's time to assemble the instrument. The body and neck are first assembled separately and then the neck is bolt to the body.
The harness for the Fishman pickups is mounted on an external temporary panel and then transferred to the control panel of the instrument, which has been previously shielded with copper adhesive shielding foil and conductive paint.
The pickups are mounted directly to the wood.
The student eventually gets to see their invention come to life, which is a thrilling moment for them.
Next we craft the nut. Making a guitar nut requires precise measurements and attention to details.
We measure the width of the neck at the nut location and the depth of the existing nut slot. After that the student is taught to shape the bone blank to the correct width and thickness using a saw and a proper file.
Using the straightedge we make sure the bottom of the nut is flat and leveled with the fretboard nut slot.
Using the nut slotting files or file, we create nut slots and file them to the correct depth and width for the strings.
Later, after the strings are mounted, we will refine them. Then the nut is carefully placed in position and fixed with a small drop of super glue.
But it's only when the strings are added that the student's instrument truly shines.
Being able to finally witness a guitar that you have been working on for the past 12 days "come to life" before your eyes is an amazing sensation.
The sketches that you had on a piece of paper are now transformed into a beautiful and functional instrument.
It's a moment of immense satisfaction and joy to see your hard work and creativity come to fruition.
The process of creating a guitar can be challenging, but the end result is worth it. Holding the finished product in your hands and seeing and listening to it play, is truly a magical experience.
.
If you are interested in learning how to build your own electric guitars and basses, whether as a passion or as a profession, and want to astound professionals with the excellence of your finishes and sound, contact Galeazzo Frudua.
Whether you are a beginner or have prior experience, Galeazzo Frudua's comprehensive course will provide you with the skills to take your guitar building to the next level.